Wrap ponytails are one of the fastest, easiest, and most stylish protective hairstyles you can wear. Whether you want a sleek high pony, a classy low pony, or a dramatic long ponytail, wrap ponytails give instant glam with minimal effort.
The best part? You can install them fast — and without causing any damage to your natural hair.
Here’s your complete, beginner-friendly guide to installing a wrap ponytail the right way.
Why Wrap Ponytails Are So Popular
-
Quick to install (10 minutes or less)
-
Look sleek and professional
-
Protective — keeps your natural hair tucked away
-
Versatile styles (curly, straight, kinky, wavy)
-
Easy to remove without breakage
-
Perfect for beginners
What You’ll Need
Before you start, grab these essentials:
-
Your wrap ponytail (Velcro or drawstring style)
-
Elastic hair tie
-
Blow dryer (optional for smoothing)
Step-by-Step: How to Install a Wrap Ponytail Quickly
1. Start With Clean or Lightly Stretched Hair
You don’t need a fresh wash, but your hair should be:
-
detangled
-
smooth
-
free of heavy build up
Lightly stretch with heat or a blow dryer for a smoother base (optional but helpful).
2. Brush Your Hair Into Your Desired Ponytail Position
Choose your style:
-
High Ponytail → Crown or top of the head
-
Mid Ponytail → Middle of the head
-
Low Ponytail → Nape area
Brush your hair upward or downward until it’s sleek.
3. Apply Gel or Mousse for a Smooth Finish
Use gel or mousse to smooth fly away and keep your pony sleek without using too much heat.
Tip:
Mousse gives a softer hold; gel gives a stronger, long-lasting finish.
4. Secure Your Natural Hair Into a Tight Bun
Tie your hair into a ponytail with an elastic band.
Then twist your ponytail into a small, firm bun.
This gives the wrap ponytail something to attach to.
Make sure the bun is:
-
secure
-
not too tight (to avoid tension headaches)
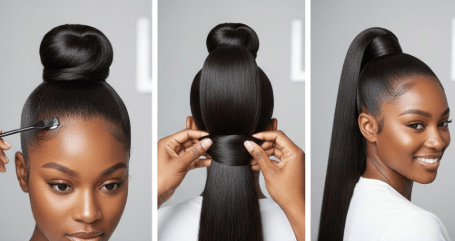
5. Attach the Wrap Ponytail
Most wrap ponytails come with:
-
a comb
-
Velcro
-
or a drawstring
How to attach:
-
Insert the comb into your bun or ponytail base.
-
Wrap the ponytail around your bun using the Velcro or drawstring.
-
Make sure it feels snug but not painful.
6. Wrap the Loose Hair Strip Around the Base
Every wrap ponytail includes a small strand meant to cover the attachment.
-
Take that strand
-
Wrap it tightly around the base
-
Secure it with a bobby pin
This hides the Velcro/drawstring and makes the style look sleek and natural.
7. Lay Your Edges (Optional but Cute!)
Use a little edge control to swoop or smooth your baby hairs.
This step adds softness and frames your face beautifully.
8. Set Everything With a Scarf
Tie a satin scarf or elastic band around the base for 5–10 minutes.
This:
-
melts the style
-
smooths gel
-
keeps the ponytail ultra sleek
-
prevents flyaways
How to Avoid Damage (Zero-Damage Tips)
✔ Don’t pull your ponytail too tight
Tight ponytails cause tension alopecia over time.
✔ Use moisturizing products
A dry base breaks easily under tension.
✔ Avoid heavy ponytails if your hair is fragile
Choose lightweight wrap ponytails to reduce pulling.
✔ Remove the ponytail before bed
Sleeping in it can tug at your roots.
✔ Protect your edges
Apply a little oil or leave-in to keep them healthy.
✔ Take breaks between installs
Let your natural hair breathe every few days.
How Long Does a Wrap Ponytail Last?
If removed daily → 1–2 weeks
If left installed → 3–5 days (before restyling)
Wrap ponytails are designed for quick installs, easy removal, and minimal tension.
Final Thoughts
Installing a wrap ponytail is one of the easiest ways to switch up your look without damaging your natural hair. With the right technique and a few simple tools, you can achieve a sleek, stylish ponytail in under 10 minutes — completely beginner-friendly and protective.