Baby hairs can take your wig from good to flawless. They help your lace melt better, make the hairline look natural, and frame your face beautifully. But if you’re a beginner, cutting baby hairs can feel intimidating — especially if you're scared of cutting too much or messing up the lace.
Good news: with the right steps, tools, and a little patience, anyone can create soft, realistic baby hairs.
This guide breaks it all down, beginner style.
Why Baby Hairs Matter
Baby hairs add:
-
A natural, realistic hairline
-
Softness around the edges
-
Better lace blending
-
A customizable, stylish finish
-
Extra hold for glue less installs
They’re optional — but when done well, baby hairs transform the entire look.
What You’ll Need
Before you start, gather these tools:
-
Clips to section the hair
Step-by-Step Guide to Cutting Baby Hairs
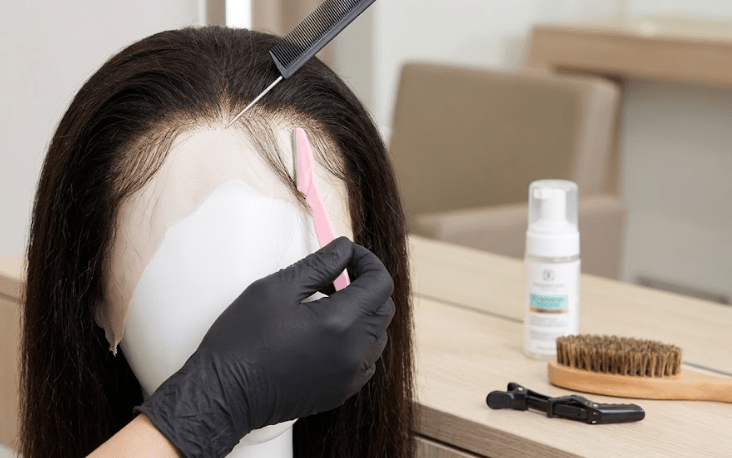
1. Place Your Wig on a Mannequin Head
This gives you better control and prevents cutting too close to the lace.
Make sure the wig is secure using pins or the adjustable straps.
2. Identify Where You Want Baby Hairs
Baby hairs usually look the most natural at:
-
The temples
-
The centre of the forehead
-
Sideburns
-
The areas where your natural baby hairs would be
Use your rat-tail comb to part very thin sections — the thinner the section, the more natural it looks.
3. Pull Out a Small Amount of Hair
Start with a small amount!
Beginners often pull out too much, which makes the wig look bulky or “wiggy.”
Tip: Lift the lace slightly and comb down just 10–20 strands at a time.
4. Trim Using an Eyebrow Razor
Using scissors can make the cut look blunt.
Instead, use an eyebrow razor and cut in a downward, feathering motion.
This gives baby hairs a soft, wispy finish.
Cut length:
½ to 1 inch is ideal, depending on your style preference.
5. Use Water or Mousse to Lay Them Flat
Lightly spray the baby hairs or apply mousse to shape them.
Use your fingers or the small edge brush to guide the direction of the hair.
For a natural look → keep it subtle.
For a dramatic look → create swoops and curves.
6. Style and Set the Baby Hairs
Use styling mousse or gel for hold.
-
Mousse: Soft and natural
-
Gel: Strong and defined hold
-
Wax stick: Best for stubborn or thick hairlines
After shaping the baby hairs, tie down the hairline with an elastic band for 5–10 minutes.
7. Final Touches
Once the baby hairs are set:
-
Lightly comb back any excess
-
Adjust the hairline if needed
-
Add powder to the lace for a seamless melt
Your wig hairline should now look clean, natural, and beginner-blessed!
Beginner Mistakes to Avoid
-
Cutting too much hair
-
Cutting the hair too short
-
Creating thick, chunky baby hairs
-
Using heavy gel that flakes
-
Not securing the wig before cutting
-
Cutting with wet hair (it may shrink later)
How to Make Baby Hairs Look More Natural
-
Use lighter colours near the front to mimic natural lightening
-
Thin out the hair with the eyebrow razor
-
Avoid perfect, symmetrical baby hairs
-
Keep swoops small for a realistic finish
Final Thoughts
Cutting baby hairs on a wig doesn’t have to be scary — it’s all about using the right amount of hair, trimming softly, and shaping gently. Start small, practice often, and you’ll quickly master the art of natural-looking baby hairs.