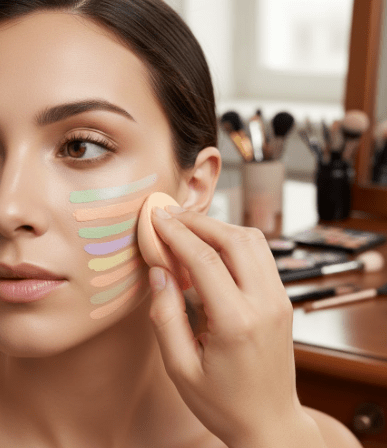
Colour correcting can feel intimidating—green on redness? Orange under the eyes? Lavender on dull skin?
But when done correctly, colour correcting can transform your makeup from “okay” to flawless.
This guide breaks down what colour correcting really does, what actually works, and how to avoid the common mistakes that make makeup look cakey or muddy.
What Is Colour Correcting?
Colour correcting uses colours opposite each other on the colour wheel to neutralize discoloration.
This means:
-
Red cancels green
-
Purple cancels yellow
-
Orange cancels blue
-
Pink brightens dull brown/purple areas
When applied in thin layers, correctors make foundation and concealer look smoother, brighter, and more even.
The Most Common Colour Correctors & What They Fix
1. Green Corrector — For Redness
Green neutralizes red, making it the best choice for:
-
Acne marks
-
Redness around the nose
-
Red blemishes
What actually works:
✔ Apply only where you see redness, not all over the face
✔ Use a thin amount — too much turns the foundation gray
✔ Blend with fingers for warmth
2. Peach/Orange Corrector — For Dark Circles
Peach/orange cancels blue and purple, making it ideal for:
-
Deep dark circles
-
Hyperpigmentation
-
Darkness around the mouth
-
Dark acne scars
What actually works:
✔ Light-to-medium skin tones → peach
✔ Medium-to-deep skin tones → orange
✔ Deep skin tones → red-orange
Blend lightly so you don’t see bright orange under your concealer.
3. Yellow Corrector — For Purple Discoloration
Yellow cancels purple tones.
Best for:
-
Purple under-eyes
-
Veiny areas
-
Bruising-like discoloration
What actually works:
✔ Dab, don’t swipe
✔ Great for olive and golden undertones
4. Lavender/Purple Corrector — For Dull or Sallow Skin
Purple neutralizes yellow, brightening dull or sallow complexions.
Use it on:
-
Dull areas on the cheeks
-
Yellow discoloration
-
Sallow skin during winter
What actually works:
✔ Use sparingly — a little goes a long way
✔ Works best under foundation, not concealer
Cream vs. Liquid Correctors: Which Is Better?
Cream Correctors
Best for:
-
Dark circles
-
Acne scars
-
Hyperpigmentation
Pros: More pigmented
Cons: Can look heavy when overused
Liquid Correctors
Best for:
-
Large areas of discoloration
-
Light redness
-
Quick everyday makeup
Pros: Lightweight
Cons: Not as intense
If you’re a beginner → liquid is easier.
How to Colour Correct the Right Way
Step 1: Apply After Skincare, Before Foundation
Correctors sit between skincare and foundation to neutralize colour underneath.
Step 2: Use a Tiny Amount
A thin veil works best. Too much corrector = muddy makeup.
Step 3: Blend the Edges Only
Don’t blend away the product completely—just soften the edges.
Step 4: Layer Foundation or Concealer on Top
Use tapping motions, not swiping, to avoid moving the corrector.
Step 5: Set With Powder
This ensures the corrector doesn’t shift throughout the day.
Colour Correcting Mistakes That Don’t Work
❌ Applying corrector all over the face
❌ Using too much (makes under-eyes look heavy)
❌ Using the wrong shade for your skin tone
❌ Not setting the corrector
❌ Putting foundation on before colour correcting
❌ Using thick, oily creams
Who Actually Needs Colour Correcting?
Colour correcting works best if you have:
-
Deep dark circles
-
Rosacea or persistent redness
-
Dark acne marks
-
Pigmentation around the mouth
-
Bruising or purple tones
If you only have mild unevenness, a good concealer may be enough.
Final Thoughts
Colour correcting does work—when you use the right shade, apply the right amount, and layer correctly.
It’s not about painting your face in rainbow colours—it’s about strategically placing the right tones to help your complexion look smooth, bright, and even.