If you’ve ever unboxed a wig and thought, “Why does this hairline look so thick?” — you’re not alone. Even the best wigs often come with a dense, uniform hairline that looks… let’s be honest… a little too perfect. That’s where plucking comes in.
Plucking your wig is the key to getting that natural, melted, scalp-like finish you see on your favorite beauty influencers. And the best part? You don’t need to be a stylist to do it. With the right steps (and a little patience), anyone can pluck a wig like a pro.
Let’s break it all the way down.
🔥 What Does Plucking a Wig Do?
Plucking helps you:
-
Create a natural, realistic hairline
-
Reduce bulkiness in the front
-
Mimic the look of natural hair growth
-
Lay your lace flatter and melt better
-
Style your wig with more versatility
Basically — plucking is what transforms your wig from “That’s cute” to “OMG, who did your install?”
🛠 What You’ll Need
Nothing fancy — just a few basics:
-
Tweezers (slanted tip is best)
-
Spray bottle with water (optional)
-
T-pins (to secure the wig)
-
Clips to hold hair back
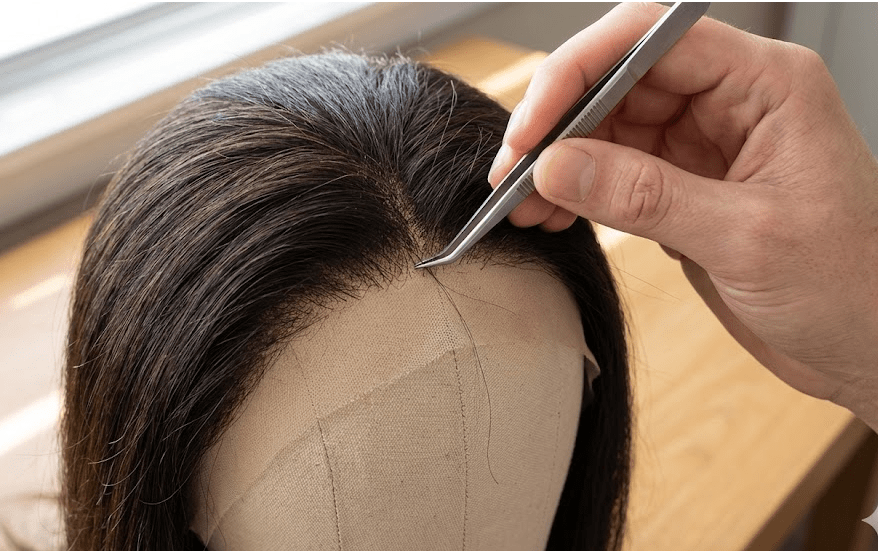
✨ Step-by-Step: How to Pluck Your Wig Like a Pro
1. Put the Wig on a Stand
You’ll work more accurately when the wig is secure and upright.
Make sure:
-
The wig is centered
-
The lace is lying flat
-
Everything is pinned down
A stable base = a clean pluck.
2. Spritz the Hairline (Optional but Helpful)
Lightly mist the hairline with water.
This:
-
Makes it easier to see the density
-
Helps control flyaways
-
Prevents accidental over-plucking
You can skip this step, but beginners usually find it easier.
3. Part the Hairline Into Sections
Use your rat-tail comb to section off:
-
The very front row of hair
-
Another small layer behind it
Clip the rest back.
This helps you avoid grabbing too much hair at once (the #1 mistake beginners make).
4. Start Plucking in a “Skip Motion”
Take your tweezers and start plucking every few hairs, NOT in a straight line.
You want soft, scattered thinning — not a harsh, straight edge.
Tips to Remember
✔ Pluck backward toward the lace, not sideways
✔ Take your time — slow and steady wins
✔ Work in small areas at a time
5. Go Layer by Layer
Once the front row looks more natural, drop down another thin section and repeat the process.
Beginner rule:
If you think you plucked enough, pluck just a little more.
Wigs are naturally dense, and gentle thinning makes a huge difference.
6. Check Your Work Often
Every few minutes:
-
Step back
-
Look at the hairline as a whole
-
Compare both sides for symmetry
-
Make sure there are no bald spots
If it’s looking too thin, stop and move to another section.
7. Don’t Forget the Temple Areas
The temples should be thinner and less dense than the middle hairline — just like natural edges.
Lightly pluck:
-
Around the temples
-
Above the ears
-
Near the sideburns
This is what makes your wig melt flawlessly.
8. Create a Soft Gradient
Your goal is a gradual transition:
-
Light density in front
-
Medium density behind it
-
Full density in the rest of the wig
This gradient is what makes the hairline look real.
🎯 Common Beginner Mistakes (and How to Avoid Them)
❌ Over-plucking the centre
→ Work evenly across the hairline.
❌ Creating bald patches
→ Pluck slowly and use thin sections.
❌ Plucking in straight lines
→ Use random spacing — nature isn’t perfect.
❌ Not stepping back to check
→ Look at the wig from different angles often.
❌ Plucking when the hair is dry and frizzy
→ Lightly misting helps you stay precise.
💡 Pro Tips for the Most Natural Hairline
✨ Use tinted lace spray or foundation after plucking for a seamless melt.
✨ Blow-dry on low heat to see the final density.
✨ Bleach the knots (if the wig needs it) before plucking.
✨ Take pictures as you go — it helps you see uneven areas.
🌟 Final Thoughts: You Can Do This
Plucking your wig isn’t hard — it just takes patience and a light hand. Once you learn the technique, you’ll never look at a stock hairline the same way again.
Practice on older wigs until you get comfy. Then? Every new wig you install will look tailor-made just for you.